Notice The float arm is not attached to the Fuel Module assembly regarding this part. The Float Arm must be properly installed to the Fuel Pump assembly before the entire unit can be installed into the Fuel Tank.
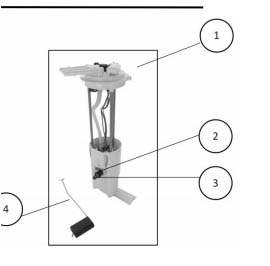
Important: In handling of the Fuel Module, Fuel Level Sender and Float Arm, the installer must take special care. Any damage, manipulation or distortion will adversely affect the accuracy of the fuel level reading. Float Arm Assembly 1. Insert the Float Arm into the Pivot Hole of the Fuel Level Sender (See Illustration 1) 2. Carefully push on
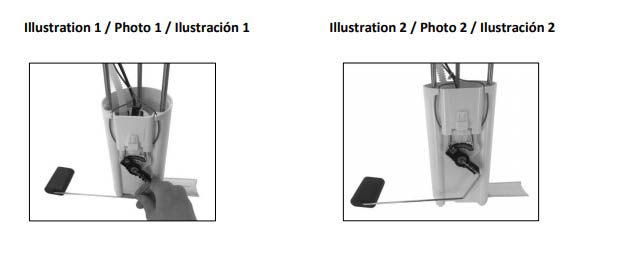
the Float Arm until it snaps into the clips of the Fuel Level Sender (See Illustration 2)
Component List / Liste de Composants / Lista de Componentes:
1. Fuel Pump Module / Module de la pompe à carburant / Módulo de la bomba de combustible
2. Fuel Level Sender / Transmetteur de niveau de carburant / Transmisor del nivel de combustible
3. Pivot Hole / Trou de pivot / Agujero del pivote 4. Float Arm Assembly / Assemblage de bras flottant / Conjunto de brazo flotador
Caution Safety Information: Repair procedures and the multiple differences in parts to service motor vehicles pIus the experience of the person performing the work make it impossible to describe all ways or types of conditions the vehicle could be serviced or provide cautionary instructions regarding hazards that could occur. Standard and accepted safety precautions should be taken when handling toxic and flammable materials. Make sure the work area is well ventilated and that it’s not exposed to open flames or electricity or heated areas. Keep the area clean and insure you have a readily accessible class B or C fire extinguishers. Consult appropriate repair manuals for the desired repair work.
Fuel Pump Installation Guide
1. Check all related fuel components, such as filters, strainers, pressure regulators, fuel relays, connections and the fuel itself to insure it is not contaminated or full of excess dirt. 2. Relieve pressure in the system by removing the fuel cap, also consult the car repair manual to see if other procedures must be followed to relieve the pressure. 3. Disconnect the negative ground from car battery to reduce the possibilities of sparks while working on the vehicle. 4. Remove the fuel from the fuel tank using approved containers as per local regulations. 5. Remove fuel tank and clean the outside of the tank. Note – you should consult the vehicles repair manual to inquire about the proper removal instructions for your vehicle. 6. Remove the pump from the tank insuring no dirt will go in the tank. 7. Clean inside the fuel tank. 8. Inspect fuel pump wiring and hoses, replace worn out and deteriorated hoses and wiring. 9. Install new fuel pump and strainer into the fuel tank. When installing also install a new O-ring (seal) between the fuel pump flange and the service of the fuel tank where the fuel pump assembly sits. 10. Reinstall the fuel tank. 11. Replace the vehicle fuel filter. 12. Fill with clean gas. 13. Reinstall the vehicle’s ground to the vehicle’s battery. 14. Start the engine and inspect for fuel leaks. Caution: If the vehicle has a supply and a return line, insure the plastic bracket on the hose is properly fastened to the vehicle. This insures that static electricity will be grounded by the bracket, eliminating arching and a possible fire.